 Transporting a kayak safely requires proper loading and securing techniques to ensure secure kayak transportation. In this article, we will guide you through the step-by-step process of carrying, loading, and tying down a kayak for worry-free travel.
Whether you are a solo paddler or have a partner to assist you, understanding the correct kayak tie-down technique is essential for secure kayak transportation. By following our expert advice, you can confidently strap down your kayak and enjoy a smooth journey.
Carrying a Kayak
When it comes to carrying a kayak, you have two options: carrying with a partner or carrying solo. Both methods require proper technique to ensure a smooth and safe transport.
Carrying with a Partner
If you have a partner to assist you, carrying a kayak becomes easier and more manageable. Each person should grab an end of the kayak using the kayak’s grab handle. The grab handle is typically located near the center of the kayak and provides a secure and comfortable grip. Make sure to communicate and coordinate your movements with your partner to avoid any accidents or strain.
Once both of you have a firm grip on the kayak, lift it together, keeping it parallel to the ground. Distribute the weight evenly to avoid tilting or tipping the kayak. Walk in sync with your partner and take small, steady steps towards your intended destination. Carrying with a partner is especially useful when maneuvering through tight spaces or over uneven terrain.
Carrying Solo
Carrying a kayak by yourself requires a bit more technique and strength. To carry a kayak solo, start by positioning the kayak on its side, with the grab handle facing up. Stand next to the kayak, facing the same direction as the kayak’s bow. Place one end of the kayak onto your thigh for support and stability.
Next, reach across the kayak with both hands and grip the inside of the boat, near the cockpit or seat area. Lift the kayak off your thigh and onto your shoulder, using your thigh as a pivot point. Take caution to maintain a proper balance and posture to avoid straining your back or neck during the lift.
Once the kayak is on your shoulder, adjust your grip and ensure that the kayak is secure and stable. Keep your free hand ready to stabilize the kayak if needed. Walk slowly and steadily to your destination, using your body’s natural movement to help distribute the weight evenly.
| Carrying with a Partner | Carrying Solo |
|---|---|
| 1. Grab the kayak by the grab handle with a partner. | 1. Position the kayak on its side with the grab handle facing up. |
| 2. Lift the kayak together, keeping it parallel to the ground. | 2. Place one end of the kayak onto your thigh for support. |
| 3. Distribute the weight evenly and walk in sync with your partner. | 3. Reach across the kayak and grip the inside near the cockpit. |
| 4. Take small, steady steps towards your intended destination. | 4. Lift the kayak onto your shoulder, using your thigh as a pivot point. |
Loading a Kayak onto a Vehicle
When it comes to loading a kayak onto a vehicle, there are a few options depending on whether you have assistance or are doing it solo. With the help of another person, the process is relatively straightforward. Both individuals can lift the kayak onto the roof rack by holding onto the bow and stern of the kayak. This ensures that the weight is evenly distributed and prevents any strain on one person.
If you’re loading the kayak by yourself, there are alternative methods you can use. One option is to invest in a lift system that assists in raising the kayak onto the rack. This can be especially useful for heavier kayaks or if you have any physical limitations. Another option is to use a kayak rack with rolling wheels, allowing you to roll the kayak onto the rack instead of lifting it.
For those who don’t have access to a lift system or a rack with rolling wheels, there’s a simple technique you can try. Place a towel or blanket on the ground near your vehicle and position the bow of the kayak on top of it. Then, lift the stern of the kayak and roll it forward onto the rack. This method requires some strength and balance, so it’s important to take your time and ensure the kayak is properly aligned on the rack before securing it.
Table: Comparison of Kayak Rack Systems
| Rack System | Features | Pros | Cons |
|---|---|---|---|
| J-Cradle | – Cradle-shaped holders for kayaks – Secure and stable – Easy to load and unload |
– Provides additional space on the rack – Suitable for various kayak sizes – Protects the hull of the kayak |
– Requires lifting the kayak higher – May limit access to other rack space |
| Stacker | – Vertical post system for stacking kayaks – Adjustable to accommodate multiple kayaks – Space-efficient |
– Allows transport of multiple kayaks – Easy to install and adjust – Provides flexibility |
– May require additional straps for stability – Can make loading and unloading slightly more challenging |
| Saddle | – Contoured pads that cradle the kayak – Provides stability and support – Offers a secure fit |
– Minimizes stress on the kayak’s hull – Fits various kayak shapes and sizes – Easy to load and unload |
– May limit the number of kayaks that can be transported – May require additional straps for security |
When securing the kayak to the roof rack, it’s important to use high-quality cam straps. These straps are designed to provide a secure attachment and prevent any movement during transportation. Start by attaching one end of the strap to the kayak’s grab handle or another secure point. Then, thread the strap through the crossbars of the roof rack and loop it back through the cam buckle. Tighten the strap until it is snug, making sure not to overtighten and potentially damage the kayak or roof rack.
By following these loading techniques and using the appropriate rack system and cam straps, you can ensure a secure and hassle-free kayak transportation experience. Remember to always double-check the tightness of the straps before hitting the road and periodically inspect them during the drive to make any necessary adjustments. With proper loading and tying down, you can enjoy your kayaking adventures knowing that your kayak is safely secured to your vehicle.
Tying Down a Kayak
Tying down a kayak properly is essential for secure transportation. One of the most effective methods is to use cam straps, which are durable and provide quick and secure attachment. When using cam straps, follow these steps:
- Loop the strap underneath the crossbars of your vehicle roof rack.
- Place the kayak on the rack, positioning it securely.
- Bring the straps over the kayak, making sure they are centered.
- Insert the end of the strap through the cam buckle and tighten it by pulling the loose end.
- Repeat this process for the second strap, ensuring both are tightly secured.
By using cam straps, you can prevent any movement or shifting of the kayak during transportation. It is crucial to check the tightness of the straps periodically throughout your journey to ensure they remain secure.
Additional Tips for Tying Down a Kayak
Here are some additional tips to enhance the security of your tied-down kayak:
- Use a ladder: If your vehicle is tall, consider using a ladder to help reach the straps. This can make the process easier and safer.
- Add a twist: To prevent strap vibration and potential loosening, add a twist to each strap before tightening them.
- Locking straps: For added security, consider using locking straps. These straps have built-in locks or mechanisms to prevent tampering or theft.
Following these guidelines and tips will ensure that your kayak is securely tied down and ready for a worry-free journey to your destination.
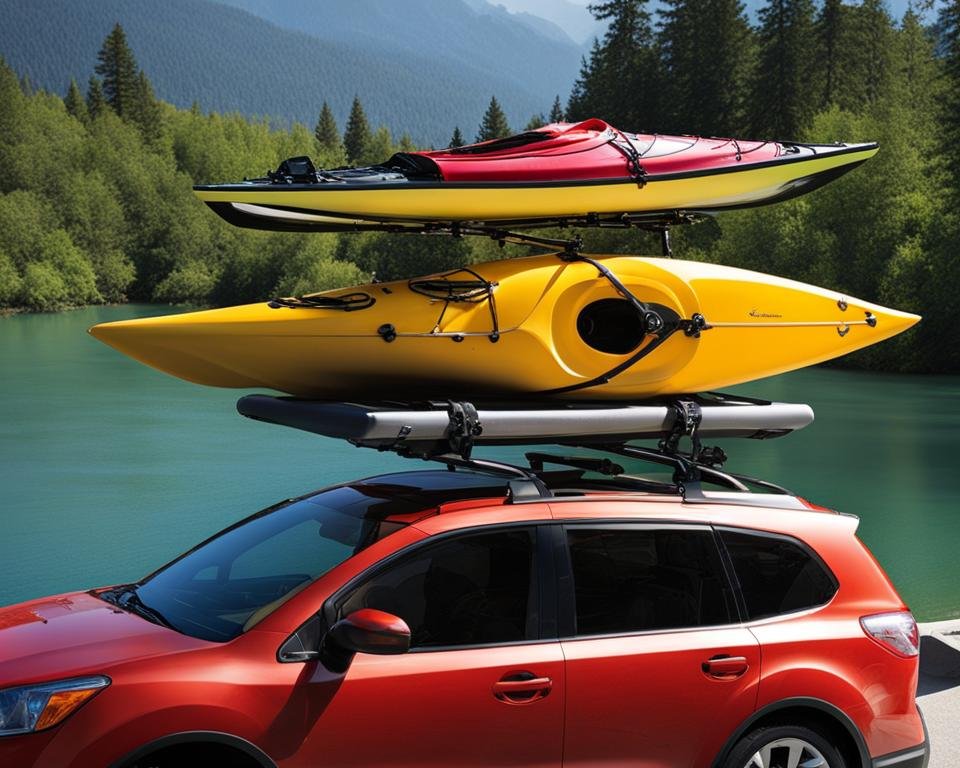
Loading Multiple Kayaks
If you need to transport multiple kayaks, there are a few options to consider. One option is to add another kayak roof rack to your vehicle. This allows you to securely transport a second kayak alongside the first one. Make sure to evenly distribute the weight of the kayaks and ensure they are centered on the racks to maintain balance while driving. Another option is to use stacker bars, which enable you to stack the kayaks on their sides to save space. Stacker bars are especially useful if you have limited roof space or need to transport more than two kayaks.
When using stacker bars, it’s important to secure each kayak properly. Use bow and stern lines to prevent the kayaks from shifting during transportation. These lines should be attached to secure points on the kayaks and the vehicle. Ratcheting bow and stern lines make installation quick and easy, providing an extra layer of security. Make sure to tighten the lines properly to keep the kayaks stable. Remember to check the lines periodically during your journey, especially if you encounter strong winds or are driving on the freeway.
Before loading multiple kayaks, consider the width of the kayaks and the crossbars on your roof rack. Ensure that there is enough space between the kayaks to avoid any potential damage or rubbing. Additionally, check the weight capacity of your roof rack system to ensure it can safely support the combined weight of the kayaks. Properly loading and securing multiple kayaks will ensure a smooth and safe journey to your paddling destination.
Tips for Loading Multiple Kayaks:
- Use a kayak roof rack system with multiple crossbars to evenly distribute the weight of the kayaks.
- Consider using stacker bars to maximize space on your roof rack and transport more kayaks.
- Secure each kayak with bow and stern lines to prevent shifting during transportation.
- Check the width of the kayaks and the crossbars to ensure proper spacing and avoid damage.
- Regularly check the tightness of the lines and the overall stability of the kayaks during your journey.
| Kayak Loading Options | Pros | Cons |
|---|---|---|
| Add another kayak roof rack | Allows for secure transportation of an additional kayak | May require additional installation and cost |
| Use stacker bars | Saves space on the roof rack | May require careful stacking and securing of the kayaks |
Securing Bow and Stern Lines
When it comes to transporting your kayak, it’s important to secure it properly to prevent any shifting or movement, especially during high winds or freeway driving. One key method to ensure the stability of your kayak is by using bow and stern lines. These lines act as additional attachments to keep your kayak in place and minimize the risk of accidents or damage.
To secure your kayak using bow and stern lines, start by attaching the lines to secure points on the front (bow) and back (stern) of your kayak. These points are typically designated by kayak manufacturers and are often located near the grab handles or rigging. Ensure that the attachment points are strong and sturdy to handle the tension from the lines.
Once you have attached the lines to your kayak, the next step is to secure them to your vehicle. This can be done by tying the lines to secure points on your roof rack or through the vehicle’s towing hooks, if available. Make sure to tighten the lines properly to prevent any slack or movement.
Table: Recommended Bow and Stern Line Attachments
| Kayak Attachment Points | Vehicle Attachment Points |
|---|---|
| Front grab handles | Roof rack crossbars |
| Rigging points | Towing hooks |
| Forward deck lines | Rack towers |
By using bow and stern lines, you can significantly enhance the overall stability and security of your kayak during transportation. These lines help distribute the weight and force evenly and prevent any forward or backward movement that could lead to accidents or damage. Remember to always double-check the tightness of the lines before hitting the road, and regularly inspect them throughout your journey to ensure they remain secure.
Tips for Secure Kayak Transportation
When it comes to transporting your kayak safely, there are several important tips to keep in mind. These tips will help ensure that your kayak remains secure during travel, reducing the risk of damage to both your kayak and your vehicle. Follow these kayak transportation tips, practice kayaking safety, and implement kayak tie-down best practices to enjoy worry-free journeys.
Protect Your Back and Use Proper Lifting Techniques
One of the first things to consider when transporting a kayak is how to lift it without straining your back. Always use proper lifting techniques, such as bending your knees and using your leg muscles to lift the kayak. If you’re carrying the kayak solo, consider wearing a personal flotation device (PFD) to add padding and cushioning for your shoulder.
Utilize a Cart with Wheels for Easier Transport
If you find it challenging to carry your kayak for an extended distance, investing in a kayak cart with wheels can be a great solution. A cart allows you to easily roll your kayak to and from the water, reducing the physical strain of carrying it for long distances. Look for a cart with durable wheels that can handle different types of terrain.
Keep the Kayak Centered on the Roof Rack
When loading your kayak onto a roof rack, it’s important to position it properly to maintain balance and stability. Make sure the kayak is centered on the rack and doesn’t extend too far on either side. This will help prevent any swaying or shifting during transportation. Take note of the kayak’s width and ensure it fits within the dimensions of your roof rack.
Regularly Check Straps for Tightness During the Drive
| Strap | Tightness |
|---|---|
| Front Strap | Secure |
| Back Strap | Secure |
| Sidestraps | Secure |
Once you have secured your kayak using straps, it’s important to periodically check their tightness during the drive. Straps can loosen over time due to wind resistance and other factors. By checking and tightening the straps as needed, you can ensure that your kayak remains securely fastened throughout your journey.
By following these tips for secure kayak transportation, you can enjoy your kayaking adventures with peace of mind. Remember to protect your back, utilize a cart with wheels when necessary, keep your kayak centered on the roof rack, and regularly check the tightness of your straps. These best practices will help ensure that your kayak reaches its destination safely and in top condition.
Conclusion
Strapping down a kayak properly is essential for secure kayak transportation. By following the step-by-step instructions provided in this article, you can ensure that your kayak is loaded, secured, and tied down correctly for worry-free travel.
Remember to always check and double-check the tightness of the straps throughout your journey. Regular inspections will help to prevent any potential movement or shifting of the kayak. It is also important to follow any specific guidelines provided by kayak manufacturers or rack systems.
By protecting your back with proper lifting techniques, wearing a PFD for added padding when carrying solo, and considering the use of a cart with wheels for easier transport, you can further enhance your kayak transportation safety. Additionally, keeping the kayak centered on the roof rack and using simple and secure tying techniques are crucial for a secure journey.
Safe travels and enjoy your kayaking adventures with the peace of mind that comes from knowing your kayak is securely strapped down!

- How to Inflate Intex Explorer K2 Kayak? - June 10, 2025
- Experience the Thrill of Tandem Kayaking with Necky Amaruk Tandem Kayaks - April 13, 2024
- How to Transport a Kayak on a Car? - February 29, 2024