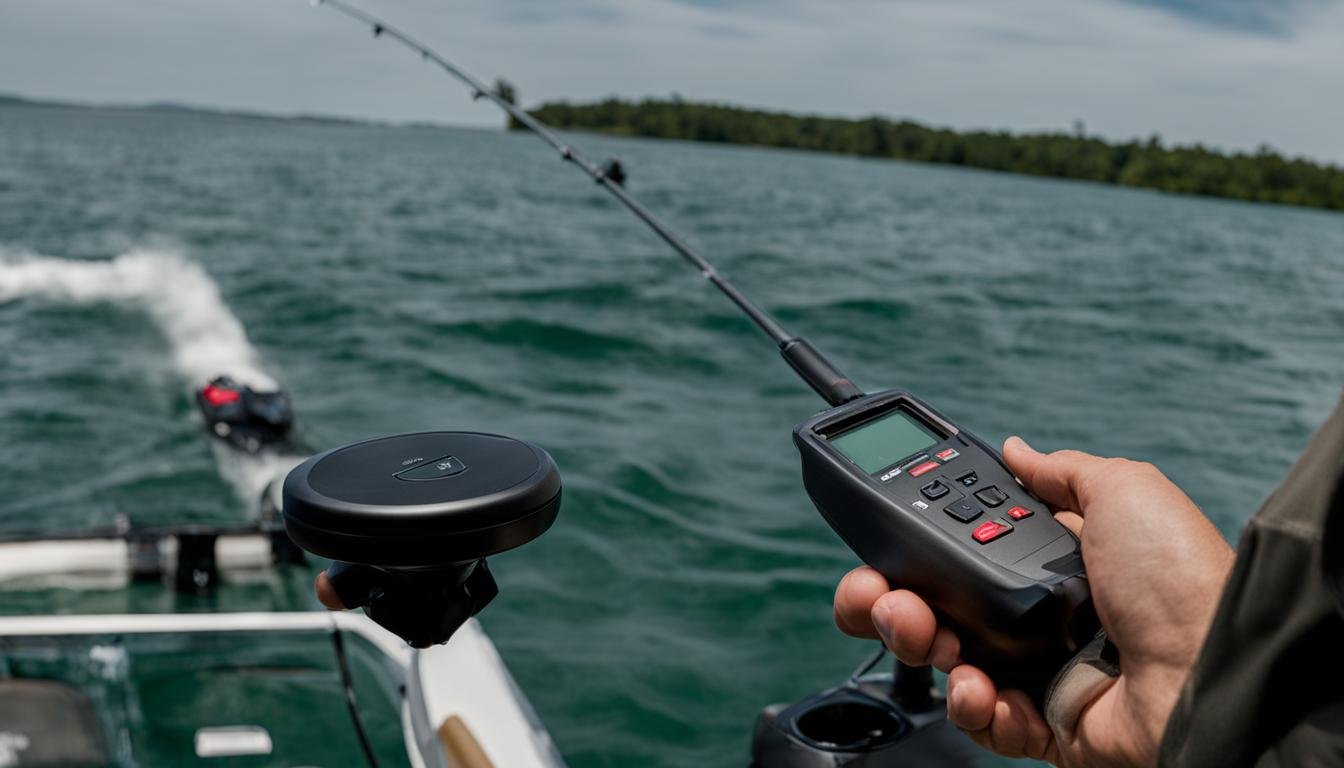
 If you’re looking for a way to take your trolling motor experience to the next level, the I-Pilot remote is an excellent option. This advanced remote allows you to navigate your trolling motor with ease, providing precision control and seamless functionality.
However, before you can begin using your I-Pilot remote, you need to pair it with your trolling motor. The pairing process can seem daunting at first, but it’s a straightforward process when you follow the right steps.
In this section, we’ll guide you through the pairing process, from understanding the I-Pilot remote’s features to preparing your trolling motor and finally pairing the remote. By the end of this guide, you’ll have the knowledge and confidence to successfully pair your I-Pilot remote to your trolling motor and enjoy enhanced navigation and control.
The following instructions will focus on the pairing process and use the SEO relevant keywords Pair I-Pilot Remote, Trolling Motor, and Pairing Process.
Understanding the I-Pilot Remote
The I-Pilot remote is a game-changing technology that enhances your trolling motor experience. The remote comes equipped with a multitude of features that allow you to navigate your boat with ease.
Features
One of the most significant features of the I-Pilot remote is its ability to control your trolling motor wirelessly. This means that you no longer need to be anchored in one position to operate your trolling motor. With the I-Pilot remote, you can move around your boat and control your trolling motor from anywhere on board.
The I-Pilot remote also features advanced GPS technology that allows you to program your route. This feature is especially useful when you are fishing in an unfamiliar area or navigating through complex waterways. The remote also allows you to store and recall up to six routes, making it even easier to navigate to your favorite fishing spots.
In addition, the I-Pilot remote comes with Spot-Lock, a feature that uses GPS to lock your boat in place. Once you’ve reached your desired location, simply engage Spot-Lock, and the remote will keep your boat in the same position, compensating for wind and current drift.
Functionality
The I-Pilot remote is designed to be straightforward and user-friendly. Its intuitive interface allows you to navigate through the various features and functions with ease. The remote features a large LCD screen that displays all the relevant information, making it easy to read even in bright sunlight.
The remote also comes with a fully customizable interface, so you can set it up to display only the features and functions that you use most often. This makes it even easier to navigate through the remote and find the feature you need quickly.
Overall, the I-Pilot remote is an innovative technology that offers a range of features and functions designed to make your trolling motor experience more enjoyable and effortless.
Preparing Your Trolling Motor for Pairing
Before attempting to pair your I-Pilot remote with your trolling motor, you need to ensure that your trolling motor is properly prepared for the pairing process. Below are the necessary steps to follow:
- Make sure the battery is fully charged: Low battery levels can cause pairing issues and hamper the overall performance of your trolling motor. Ensure that your battery is fully charged before attempting to pair your I-Pilot remote.
- Activate the pairing mode: To activate the pairing mode, turn on your trolling motor and press and hold the “pair” button for two seconds. Once the “pair” LED light starts flashing, release the button to enter pairing mode.
- Set up the remote for pairing: Turn on your I-Pilot remote and navigate to the pairing menu. Select “pair new remote” and follow the on-screen instructions.
- Place the remote in close proximity to the trolling motor: Ensure that the remote is within three feet of the trolling motor for optimal wireless connectivity during the pairing process.
- Wait for the pairing process to complete: Once the pairing process begins, it may take a few minutes to complete. Do not interrupt the process or turn off either the remote or the trolling motor during this time.
By following these steps, you can ensure that your trolling motor is properly prepared for the pairing process and avoid any potential complications. Remember to keep the remote in close proximity to the trolling motor and wait for the pairing process to complete for a successful pairing.
Pairing Your I-Pilot Remote with the Trolling Motor
Now that your trolling motor is prepared and in pairing mode, it’s time to pair your I-Pilot remote. Follow the steps below to establish a wireless connection between the remote and the trolling motor:
- Hold down the “Learn” button on the trolling motor’s control panel until the indicator light starts flashing.
- Press and hold the “+” and “-” buttons on the remote simultaneously for three seconds until the remote’s screen displays “PAIRING MODE.”
- The remote will automatically search for available trolling motors to pair with. Once it has found your trolling motor, the remote’s screen will display the trolling motor’s name and a prompt to confirm the pairing. Press the “YES” button to confirm.
- Once the pairing is confirmed, the trolling motor’s indicator light will stop flashing, and the remote will display a message confirming the successful pairing.
It’s important to note that the I-Pilot remote can only be paired with one trolling motor at a time. If you want to pair the remote to a different trolling motor, you’ll need to unpair it from the original motor first. To do this, simply hold down the “Learn” button on the original trolling motor’s control panel until the indicator light stops flashing, indicating that the remote has been unpaired.
Troubleshooting and Tips
Despite following the pairing process carefully, you may encounter some issues during the pairing of your I-Pilot remote and trolling motor. Here are some troubleshooting tips to help you overcome them:
- If your remote fails to connect with the trolling motor, ensure you are within range and that the trolling motor is in pairing mode.
- If the remote and trolling motor connection is unstable, check the battery levels on both devices and replace them if necessary.
- If the paired trolling motor does not respond to commands from the remote, try resetting the pairing process and follow the instructions again.
To enhance your pairing experience and ensure smooth navigation, consider the following expert tips:
- Familiarize yourself with the features and capabilities of your I-Pilot remote. Knowing what it can do will help you use it to its full potential.
- Use the I-Pilot app to unlock additional features and functionality that can enhance your trolling motor experience.
- Regularly update your trolling motor’s software to ensure it is up to date and functioning properly.
By following these troubleshooting tips and expert advice, you can ensure a successful pairing process and enjoy seamless navigation with your I-Pilot remote and trolling motor.
Conclusion
In conclusion, successfully pairing your I-Pilot remote to your trolling motor is a straightforward process when following the right steps. By understanding the capabilities of the remote, preparing your trolling motor, and carefully executing the pairing process, you can enjoy seamless navigation and enhanced control of your trolling motor.
Remember, the key is to ensure that your motor is in pairing mode and that the remote is within range. If you encounter any issues during the pairing process, refer to the troubleshooting tips we provided in Section 5.
We hope that this pairing guide has been helpful in improving your overall fishing experience. By taking advantage of the advanced features and functionality of the I-Pilot remote, you can maximize your time on the water and focus on reeling in your next big catch!

- Experience the Thrill of Tandem Kayaking with Necky Amaruk Tandem Kayaks - April 13, 2024
- How to Transport a Kayak on a Car? - February 29, 2024
- What Size Battery for a 30 LB Trolling Motor? - January 31, 2024